2015
SAC CW 2015
So was this years SAC CW Contest over! I had serious competing plans running SO2R and be at the top of the game this year, unfortunately our best of friends Mr Murphy decided to pay a visit! The days before the contest I prepared stuff at the station. Big thanks also to SM0KDG Dag who helped out changing a faulty coax to an antenna on friday evening before the contest! I was in the forrest myself on friday evening putting the beverage antenna switch matrix boxes in place after thunder season. It took quite alot of time (as it usually does) but the result was ever so good! We also found the 330 degree beverage (to W6/KL7 from here) was broken. This has to be fixed soon!
During the week prior to the contest I digitalized the home brew rotator för the 8 element 10m quad getting it controllable via our station automatyion system openASC. The indicator for the antenna is done by a syngon element, so I figured the KISS method (Keep It Simple Stupid) of digitalizing this would be just to glue a potentiometer to the axis of the syngon element, so I did, and mounted the rotator card for the openASC bus inside the rotator box.
Everything was ready for the contest except setting up the logging software that I planned doing on the morning before the contest. So about 3 hours before "liftoff" I came to the station and started messing around with Win-Test and the MK2R+ SO2R box. But I was not able to get Dual CQ working in any way.. Either Radio A or Radio B was transmitting but not both. So last minute call was to work only one radio to have everything working. I managed to get on air just when the contest started.
After a few hours I had to go outside for a "technical brake", and noticed that two of the antennas was pointing in strange directions! WTF! So it took me little over one hour to correct this and I lost at least 100-150 QSOs.. And afterwards really pissed of, and at 2 AM we had K index 7 and aurora and I could not motivate myself to stay awake so I decided to rest for a while, woke up at 6 AM and started working again. So the final result was 1600 QSOs and 121 mults. Could have been 1800 QSOs and lots more mults if I've had both rigs.
I will make a new attempt in the SSB part in October. ( Pray to the propagation gods and will try to fence Mr Murphy off)
[Not a valid template]2015
Preparing for SAC 2015
This weekend I started preparing for SAC (Scandinavian Activity Contest) that will take place next weekend (CW) and the SSB part in october. When I have been running SO2R with the MK2R+ SO2R box from Microham there has been a problem with a ground loop between the LF from both transceivers. So this weekend I spent some time going throgh my junk boxes for some audio transformers. I found 2 pairs of 600 ohm audio transformers, took them out of their plastic casings and made a new HF proof one out of PCB board. Perhaps ugly but it works, no one will see it anyway since it is hidden.:)
Now the audio coming from the SO2R box is perfectly clear and without annoying "hum". Still have some stuff to do during next week. Beverage boxes need to go back into the woods after thuder season and an antenna needs some repairs. Hopefully I will get everything running before the weekend !
[Not a valid template]2015
Potentiometer solution for the Prosistel / Bigboy rotators!
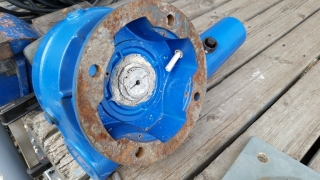
The blog has not been updated since last year and I figured it's time to start again! Summer is always a hectic period of the year for station maintenance. This winter we lost two potentiometers again in two Prosistel PST-71 rotators. This has happened many times and we are pretty much tired of replacing them because the process requires access to the bottom side of the rotator which means you have to take the whole thing down on the ground.
The construction is really crappy. The pot sits in a small space in the bottom of the rotator, the shaft of the pot is not mechanically de-stressed which means we lost several pots to mechanical breakdown. Another issue is that water easily collects at the base of the rotator making the small space below very damp and things start rusting. I know that many many others have had exaktly the same issues from emails and some videos on youtube. So I decided this time everything will be re-done!
I sketched up a new box that should be mounded below the rotator itself and by drilling a hole in the rotator plate a shaft can be inserted and run down in the new box. Got some help from Thomas SM0CXU to build the boxes and this last weekend myself, Thomas and Dag SM0KDG did the job. I have a gut feeling we will be pretty much problem free now for many years to come!
Here are some pics:
[Not a valid template]2014
New WARC-band tower
Behind the shack we have a tower that has had a 6m antenna and various yagis over the years. I decided last winter it was time to redo the whole shabang and making a WARC band tower out of it. So I designed two 5 element monobanders (for 12 and 17m) from old hy-gain scrap lying around the station. Now it was finally time to get the antennas up the tower! The summer in SM has been really fantastic this year and the work was done in 30 deg C heat. Sweaty and warm!
First step was getting the old 6m antenna down, old rotator and mounting plates for it and the thrust bearing. Everything was greased up and the rotator and thrust bearing got new mounting platse in the tower. After that we used the gin-pole to lower down the new 7m long mast pipe into the tower. The 12m yagi was hoisted up by myself and the tower guy this time was Dag SM0KDG. The yagi was put into place and the antenna plus mast pipe was slowly pulled upwards so the rotator could be fit into the tower. Whan this was finished the 17m yagi was hoisted up, but it was quite tricky since the elements wanted to get stuck in everything since the spot for the tower is quite a tricky place. Finally the antennas was in placed and the first smoke test showed that they were working like they should! =)
Here are some pictures =)
[Not a valid template]2014
80m yagi and 20m quad fix
Last week to get ready for the IARU contest (we operated as SK9HQ) I spent most of the week at the station doing maintenance. During spring we lost the 6 element 20m quad. Rotator stopped working and coaxial was broken in the tower. Also I needed to get the 80m yagi hooked up again, getting a new feedline up the tower and also a new control cable for the relay boxes on each of the elements of the yagi. On Monday last week I climbed the 45m self supporting tower that holds the 80m yagi. Brought up the coaxial and control cable from the ground with the help of the ground crew SM0T and SM0IMJ. I made a new break out box for connecting the various cables up in the tower. Made all connections in the break out box and then connected the 7/8" coaxial with a short piece beteen the balun in the antenna and the top of the tower. Both cables was turned few turns around the mast pipe. Made a short video from the top of the tower.
And here is the first test turning the yagi with the PST110D-PRO rotator in the evening..
On wednesday we brought the broken Prosistel PST-71 rotator down from the tower.. It seems they have a serious problem with the potentiometer. We have had issue with this several times now on several rotators, some how the potentioneter is mechanically damaged, maybe their alignment is bad.. The thing that pisses me off is that you have to bring the whole rotator down to ground to be able to change the potentiometer. Its a big job since they are heavy! I just realilized this is the 4th time. The 40m Quad also stopped working in the winter and i figure its the same problem again since thunder is not an issue in the winter here.. Alot of wasted work..
I changed the Potentiometer in the rotator, picture of that in the gallery below.. And myself together with Dag SM0KDG got the rotator back in the tower, unfortunately changing the potentiometer caused a problem with the bolt that goes to the rotator top clamp and mast tube to eliminate torque slipping in the clamp. Another stupid Prosistel problem that you can not dynamically tell the rotator box that the specific voltage coming back from the pot is a certain direction. This can be done with for instance the Green Heron rotator box but I think it is stupid you have to buy a expensive extra box when Prosistel should rethink their rotator box instead..
[Not a valid template]2014
HBØ/SMØW – Liechtenstein holiday style DXpedition
On the other side of the move.. I have not been very busy on the blog lately. Me and my fiancee just moved to a new house 5 weeks ago and alot of time have been spent unpacking all boxes etc.. that needs to be done =) But still decided to do a very relaxed DXpedition to Liechtenstein just before the hamconvention in Freidrichshafen Germany. I wanted to try a new DXpedition holiday concept antenna. Criteria for the antenna would be,
1. Small,
2. Very lightweight (Whole antenna + 100m of transmission line + tuner + glassfibrepole <10 kg of weight)
3. Very low loss
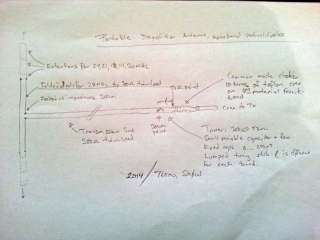
So the week before our trip I made a vertical dipole out of 300 ohm twinlead for 28 MHz. At the ends of the antenna i mounted cableshoes that fits into cableshoe joints. For 28 MHz there is just a small short circuit plug and then I made extensions for the other bands. In this way I got optimal monoband vertical dipoles for all bands 10, 12, 15, 17, 20 and 30m. The vertical dipole is just taped to a 10m long glass fibre rod that fits neatly into the travelling bag.
The folded monoband vertical dipole at resonance is very close to 300 ohms, which means that I fed the antenna directly with 300 ohm twinlead! Twinlead as all balanced lines has very low loss. This means you can have several hundred meters of transmission line and barely loose anything.
This is the basic sketch of the antenna:
At the shack end the balanced 300 ohms needs to get down to 50 ohms unbalanced, so a simple "lumped element L-network tuner" was built. Basically just a small variable capacitor capable of taking the power you are running that sits in between the leads of the twinline. After that a short piece of twinlead (different for each band) is inserted as a lumped L. The two components in the L-network bring the impedance down to 50 ohms balanced at very low loss. Then I wound 10 turns of small lightweight teflon coax on a 43 material ferrite bead. This will make the balanced to unbalanced part of the tuner and also make sure nothing spurious escape from the shack to the antenna.
Here are some more pics, enjoy!
[Not a valid template]
2014
RXADS progress #3
Was quite some time since i posted anything to the blog. Life's been busy. We're just in the process of moving into a house so most of the time has been spent on that. But I have still had some time to do some ham radio stuff in between everything =) I have mostly been working on the RX Antenna Distribution System (RXADS). It's nearly finished now, two band pass filter units are missing and when they are done I need to do more exstensive measurements of everything, but at the moment insertionloss through the system is well below 1dB which is really good! The most inserionloss occours in the band pass filter units of course!
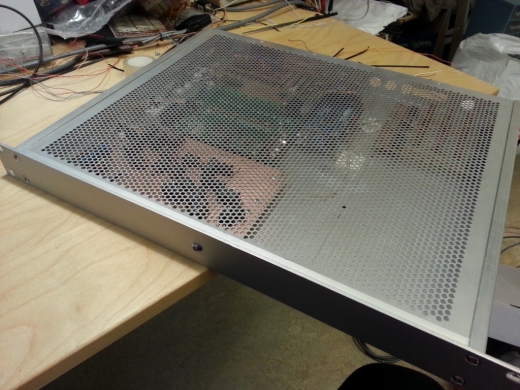
This is how the 1RU box looks like!
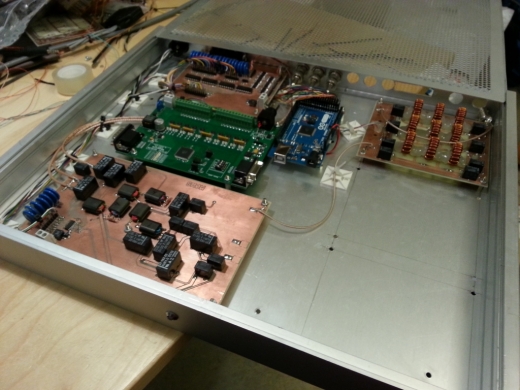
And on the inside like this:
The card closest to the camera is the combiner card, the the openASC driver module that will connect the unit to the rest of the antenna switching at the station. After that the interface card that collects and filters all low level signals between the driver card, arduino micro controller, band pass filters and the switchingcards that will be in the forest. In the middle the blue card which is the bought Arduino programmable microprocessor that works as the logic in the system and to the far right the band pass filters. You can see two is still missing, they actually take some time to make, I will post more on them later.
It was really fun to start learning the Arduino and I got the source code ready and working after many hours of pulling hair, but I think I got the hang of it now 😉
I also finished the Switchbox for the WARC bands this weekend, so tomorrow I will go up to the station and hook it up in the rest of the system. Some pics here:
[Not a valid template]
2014
RXADS progress #2
Last week my RX antenna switching cards finally came in the mail from the PCB maker. Had to solder them up right away last week. =) The design came out just the way I wanted. There are 7 antenna inputs per card and possibility to extend to another card with additional 7 antenna inputs, so in total it will be possible to switch any of 14 RX antennas to any of 3 receievers. Theese cards will be in the forest about 150m away from the house/shack in a plastic box as described in an earlier post.
The relay matrix for each receiver is controlled by a 4-bit binary code, where the last bit is used only for switching to the extended card. All of the inputs are protected by RC low-pass filters and MOVs. The antenna inputs and outputs are protected by 90V gas discharge tubes. I added the possibility to connect preamps in the future with relays for that as well. Here are some pics of the finished cards.
[Not a valid template]


